Detail Screen
Our Main Screen shows a List of Moments, Let’s add feature when the user click on a Moment He’s taken to a Detail Screen where it shows the Image, Title and A Map with the Location of the Moment. Our Completed Detail Screen would look like the following Screenshot.
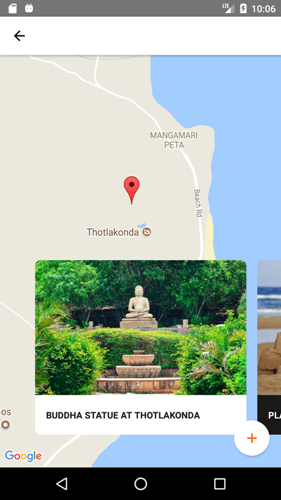 Hey man! I see a half image at right, what’s with that?
Ok so the above statement wasn’t entirely true, instead of a single moment with the location we’ll have a Carousel with all the moments in the details screen. That’ll make our Detail Screen a little more fancy, right?😊
Do you see a Card with an image and a title at the bottom of the above screenshot? We could easily just import the Tile from react-native-elements for that. But where’s fun in that😜, besides the Tile component doesn’t give the control we need. So to show how easy it is to create custom Components in react-native, I’ll create a custom Component MomentCard that we’ll use in our Detail Screen to render our moments. So Let’s create the MomentCard Component…
MomentCard
Let’s break up what our MomentCard would contain..
- An
Imagecomponent to display the moments image - A
Textcomponent to display the title of the moment in uppercase - And we have a bonus feature where the MomentCard background switches from Black to White depending on the index
First of all create a file with the name MomentCard.js in your components directory. Let’s add the basic react component code as follows
import React, { Component} from 'react';
import { Text} from 'react-native';

export default class MomentCard extends Component {
    render () {
        return (
          <Text>Moments Card</Text>
        );
    }
}
- let’s import the required components from
react-native..
import { View, Text, Image, TouchableOpacity } from 'react-native'; - In the render method let’s get the props
title,image,even(this prop will tell if the background should be in black or white). We’ll pass these props toMomentCardfrom Detail Screen.
const { title, image, even } = this.props; - Now let’s change our render method to return our desired component…
          <TouchableOpacity
            activeOpacity={0.7}
            style={styles.slideInnerContainer}
            onPress={() => { alert(title); }}
            >
              <View style={[styles.imageContainer, even ? styles.imageContainerEven : {}]}>
                  <Image
                    source={{uri: image}}
                    style={styles.image}
                  />
                  <View style={[styles.radiusMask, even ? styles.radiusMaskEven : {}]} />
              </View>
              <View style={[styles.textContainer, even ? styles.textContainerEven : {}]}>
                  <Text style={[styles.title, even ? styles.titleEven : {}]} numberOfLines={2}>{ title.toUpperCase() }</Text>
              </View>
          </TouchableOpacity>
So what are we doing here.. First of all we have TouchableOpacity as our root component, then we have two View child Components. One of the child View component contains a Image component and other one contains a Text component. That’s it!
- Wait we have assigned a style prop to all our components but haven’t defined any of those, have we? We don’t have a variable/const/import named
styleswithslideInnerContaineror any other styles object. Let’s add that that..- Our StyleSheet for
MomentCardwould be a bit long so instead of writing it in the same file asMomentCard.jswe’ll create a new file with the nameMomentCard.style.js(create this in a new directory named styles inside our current components directory) which would contain the required styles forMomentCard -
inside the
MomentCard.style.jsfile add the following lines of codeimport { StyleSheet, Dimensions, Platform } from 'react-native'; const { width: viewportWidth, height: viewportHeight } = Dimensions.get('window'); function wp (percentage) { const value = (percentage * viewportWidth) / 100; return Math.round(value); } const slideHeight = viewportHeight * 0.4; const slideWidth = wp(75); const itemHorizontalMargin = wp(2); //we'll be using these two exports in Detail Screen export const sliderWidth = viewportWidth; export const itemWidth = slideWidth + itemHorizontalMargin * 2; const entryBorderRadius = 8; export default StyleSheet.create({ slideInnerContainer: { width: itemWidth, height: slideHeight, paddingHorizontal: itemHorizontalMargin, paddingBottom: 18 // needed for shadow }, imageContainer: { flex: 1, backgroundColor: 'white', borderTopLeftRadius: entryBorderRadius, borderTopRightRadius: entryBorderRadius }, imageContainerEven: { backgroundColor: '#1a1917' }, image: { ...StyleSheet.absoluteFillObject, resizeMode: 'cover', borderRadius: Platform.OS === 'ios' ? entryBorderRadius : 0, borderTopLeftRadius: entryBorderRadius, borderTopRightRadius: entryBorderRadius }, radiusMask: { position: 'absolute', bottom: 0, left: 0, right: 0, height: entryBorderRadius, backgroundColor: 'white' }, radiusMaskEven: { backgroundColor: '#1a1917' }, textContainer: { justifyContent: 'center', paddingTop: 20 - entryBorderRadius, paddingBottom: 20, paddingHorizontal: 16, backgroundColor: 'white', borderBottomLeftRadius: entryBorderRadius, borderBottomRightRadius: entryBorderRadius }, textContainerEven: { backgroundColor: '#1a1917' }, title: { color: '#1a1917', fontSize: 13, fontWeight: 'bold', letterSpacing: 0.5 }, titleEven: { color: 'white' } });What’s going on here…
- First of all we import
StyleSheet,DimensionsandPlatformfromreact-native.StyleSheetis used to define the styles(of course),Dimensionsis used to get the Dimensions of the device andPlatformmodule let’s us write Platform specific code. - Next we get the
widthandheightof device asviewportWidthandviewportHeight - then we define a function with the name width_percentage, that takes percentage as argument and return the percentage of width.
- Then we have a bunch of constants defined. Two of them we are gonna use in Detail Screen, and others in this file below.
- Next we have all the styles we require for
MomentCard. I won’t go into it much as styles we defined are straight forward, and are understandable at a glance.
- First of all we import
- Our StyleSheet for
- Now let’s import all the styles in MomentCard as follows
import styles from './styles/MomentCard.style';, remember we have our styles file instylesdirectory. - With that we have our
MomentCardcomponent ready to be used in our Detail Screen, but wait where’s the DetailScreen🙄🤔? We haven’t actually created it yet, So let’s do that…
Detail Screen
Let’s now implement the Detail Screen,
- create a new file with name
DetailScreen.js - add a basic react component code which returns text, like this..
import React, { Component } from 'react'; import { AppRegistry, StyleSheet, Text, View, Button } from 'react-native'; import { Icon, ListItem, Tile } from 'react-native-elements'; export default class DetailScreen extends Component { render() { return ( <Text>Hello Detail Screen</Text> ); } } - Now Let’s add the Detail Screen to the Stacknavigator
import DetailScreen from './components/DetailScreen.js';- add DetailScreen to StackNavigator
const TravelLogStackNav = StackNavigator({
  Main: {screen: MainScreen},
  Detail : {screen : DetailScreen},
});
if you wanna see if your Details Screen is working properly, just swap the order of the screens in the Stacknavigator.
- Now since our Detail Screen is added to the Stack, let’s make our render method return the bare bones View that we want to see…
  <View style={styles.container}>
      <View style={styles.colorsContainer}>
        <Text>Your Map Location Here</Text>
      </View>
      <ScrollView
        style={styles.scrollview}
        indicatorStyle={'white'}
        scrollEventThrottle={200}>
          {/* our carousel will go here */}
      </ScrollView>
  </View>
Here we have a Root
Viewcomponent which contains aViewand aScrollView. Our childViewcomponent would contain the map andScrollViewwould contain the carousel. Where are all the styles defined? don’t worry we’ll define them in the next step. - Let’s define
stylesconstant that we are using for the aboveViewcomponents. Add the following lines of code at the bottom ofconst styles = StyleSheet.create({ container: { flex: 1, backgroundColor: 'hsl(15, 55%, 50%)' }, colorsContainer: { ...StyleSheet.absoluteFillObject, flexDirection: 'row' }, scrollview: { flex: 1, position: 'absolute', bottom: 0, } });Again I hope the style definitions are pretty understandable, we have set flex to 1 and given a background to our main container, we have our map container fill the screen. and have set our scrollView which would contain the carousel to the bottom.
Navigate and Props
All is well and good but how do we actually navigate from Main Screen to Detail Screen. React navigation gives a cool Prop named navigate, which allows us to navigate from one screen to another. Since you’ve already taken ReactJS bootcamp, you should have a pretty good understanding of Props(If you don’t? “abort! abort!”). Props are the way different components talk to each other.
So in Main Screen we have a list of moments which when clicked should navigate to detail screen. Let’s implement that,
[from react-native-elements documentation] we can pass a prop onPress to a ListItem which should be set to a function. So let’s refactor our renderListItems return a listitems with onPress prop. after adding onPress prop our renderListItems should look like…
renderListItems(moment_obj,index) {
    const {navigate} = this.props.navigation;
    return (
      <Tile
        imageSrc={{ uri: moment_obj.image}}
        title={moment_obj.title}
        featured
        key={index}
        onPress={() =>{navigate('Detail');}}
      />
    );
}
you also must bind the method, since we are using this.props inside renderListItems method.
constructor(props){
    super(props);
    this.renderListItems = this.renderListItems.bind(this);
  }
Now if you go back to emulator and reload(menu->reload), you’d see the Main Screen and when you click on one of the ListItems it would take you to the Details Screen. But it isn’t doing anything fancy, is it? now let’s send the moment data from Main Screen to Detail Screen and show it the detail Screen.
React Navigation navigate action takes another argument that again can be retrieved from the destination screen. so you can change the onPress prop to.
onPress={() =>{
            this.props.navigation.navigate('Detail', { details : moment_obj,details_list : this.state.moments,moment_key : index});
          }
Here we are passing an object as second parameter which again has three nested objects that contains the current object with details key, all the moments from the state with details_list as the key and index of the current moment with moment_key as the key.
Now we can retrieve these moment details from the Detail Screen, lets’ do that…
From the DetailScreen render method declare a new variable details and set it to this.props.navigation.state.params.details.
var details = this.props.navigation.state.params.details;
This will retrieve the details moments object we passed in the MainScreen. Let’s see what this details variable is assigned to, by print it on the details screen. Go to render method and inside return change Hello Detail Screen to {JSON.stringify(details)}. why use JSON.stringify()? because we are sending a JSON object from MainScreen and <Text> Component only accepts Text. If everything worked well, you should see some JSON data like this…
{"title" : "Playing at the beach","image" : "http://d33y93cfm0wb4z.cloudfront.net/Ella/client_content/banana_boat/beach_games.jpg","location" : {"lat" : 17.686816,"lon" : 83.218482}}
Similarly if you try to print details_list object array you’d get something like this…
[{"title":"Buddha statue at Thotlakonda","image":"http://smartvizag.com/media/img/thotlakonda-1.jpg","location":{"lat":17.8284491,"lon":83.40908}},{"title":"Playing at RK Beach","image":"http://d33y93cfm0wb4z.cloudfront.net/Ella/client_content/banana_boat/beach_games.jpg","location":{"lat":17.7132948,"lon":83.3188533}},{"title":"Boat Riding at Vuda Park","image":"https://lh5.googleusercontent.com/p/AF1QipMhoXaRFZ_oMznF6vhP57yX9g67LBXqddr7NXVa=w408-h306-k-no","location":{"lat":17.7235019,"lon":83.3386034}},{"title":"Picnic at Zoo","image":"http://images.hikeezee.com/destinations/indira-gandhi-zoological-park-3059/Indira-Gandhi-National-Park-%2811%29_original_watermark.jpg","location":{"lat":17.7679,"lon":83.3454}},{"title":"Playing at the beach","image":"http://d33y93cfm0wb4z.cloudfront.net/Ella/client_content/banana_boat/beach_games.jpg","location":{"lat":17.686816,"lon":83.218482}}]
And if you try to print the value of moment_key you’d get the index of the moment like 0/1/2/4.. depending on which moment you clicked on.
Now let’s use this data and use it to create our desired View. Let’s discuss the pieces we need, to put Detail Screen together. 1st there’s a map in the background, followed by a carousel with the a MomentCard component for each moment in the details_list array in the foreground.
Well that’s all good but where does the carousel come from? Do we have to implement it ourselves? does react-native-elements have a carousel component? are you hiding something from us?😑 Tell us the truth!🙁
No, we neither are going to implement it ourselves nor react-native-elements comes with a carousel. We are going to use a new module for our carousel called react-native-snap-carousel
Carousel
- First of all let’s install the react-native-snap-carousel module with..
npm install --save react-native-snap-carousel - Now we can import our Carousel component in the Detail Screen like..
import Carousel from 'react-native-snap-carousel'; - To keep our code clean and readable let’s create a method that returns the carousel and call it from inside the ScrollView
get carousel () {
      return (
          <Carousel
            sliderWidth={sliderWidth}
            itemWidth={itemWidth}
            inactiveSlideScale={1}
            inactiveSlideOpacity={1}
            enableMomentum={true}
            autoplay={true}
            firstItem={this.props.navigation.state.params.moment_key}
            autoplayDelay={5000}
            autoplayInterval={10000}
            containerCustomStyle={{marginBottom: 30}}
            showsHorizontalScrollIndicator={false}
            snapOnAndroid={true}
            removeClippedSubviews={false}
            onSnapToItem={(index) => {
            var location = this.props.navigation.state.params.details_list[index].location;
            console.log(JSON.stringify(location));
            }>
                <MomentCard
                  key={0}
                  even={true}
                  {...this.props.navigation.state.params.details}
                />
            </Carousel>
      );
  }
Let me explain what’s happening here…
- The above method returns a Carousel component with a bunch of attributes, first and second one is
sliderWidthanditemWidthboth set to the same value, that’s fishy… are they the default values? coz I don’t remember defining them anywhere🤔.
No they aren’t default values, see there aren’t any quotes there. So where did they come from you might ask, remember we defined two constants inMomentCard.style.jsand said we’ll use them in Detail Screen later, well here’s where we are using them. import those two constants likeimport { sliderWidth, itemWidth } from './styles/MomentCard.style'; - Let’s skip the next three attributes since they aren’t important, next we have
autoplayset to true.(you might have already guessed what it does). thefirstItemif set let’s us control which slide is shown first. autoplayDelayandautoplayIntervallet’s us define the time delay to start the Carousel and time internal between each slide.- Then we have the container style definition that is set to a style object with marginBottom set to 30. The next attribute
showsHorizontalScrollIndicatorlet’s us specify whether to show the scroll indicator or not, in our case no. - Again the next two attributes aren’t that important, let’s skip to the last important one.
onSnapToItemis called when our Carousel snaps to a slide, and takes a function to which we can pass the index of slide as attribute. - Next we have
MomentCardcomponent wrapped inCarouselcomponent to which we are giving the details we got from the Main Screen as prop. along with two other props.(don’t blame me if you getCan’t find variable: MomentCarderror) - Now let’s call this methond in the ScrollView, remove the
{/* our carousel will go here */}part and replace it with{ this.carousel }. - If you run this now you’ll see a single moment at the bottom of the screen, well don’t know about you, but this doesn’t look much amusing to me. Let’s give it a magic touch and turn this into a auto scrolling carousel, full of moments.
- The above method returns a Carousel component with a bunch of attributes, first and second one is
- Right now we have a carousel with just one image. Does it even count as a carousel when it has only one image?🤔🤣 Let’s turn it into a real carousel by adding a list of moments to it.
- add a new method
getMomentsthat takes an array of moments data and turns it into an array ofMomentCard.getMoments (moments_list) { if (!moments_list) { return false; } return moments_list.map((entry, index) => { return ( <MomentCard key={`carousel-entry-${index}`} even={(index + 1) % 2 === 0} {...entry} /> ); }); }
- add a new method
- Now remove the single
MomentCardfrom theCarouseland call the above method as follows…{ this.getMoments(this.props.navigation.state.params.details_list) }here we are passing the list of moments we get from Main Screen to
getMomentsmethod. - If Everything went well you should see a beautiful carousel will all of our moments.
Map View
As Said before we’ll not be implementing Map here, you can either leave the map section as it is or set it to a Text component that shows the Lat. and Lon. of the moment.
(note : I prefer my Lat. Lon. to change on each slide change😉)
And that’s it for Part IV, we’ve successfully passed data from one Screen to Another and displayed it in our destination Screen using React navigation navigate. Let’s catch some fire with Firebase in Part V…