Main Screen
In Last part we Learned how to create and run our app on the Emulator. But it isn’t doing anything fancy, is it? Let’s Change that, open index.android.js and you’ll see that everything is just like ReactJS Project. There’s a render method which returns some JSX, If you go back to your emulator you’ll notice that the text on Emulator comes from this file.
Since you know where’s the text coming from, let’s try changing it. In index.android.js in render method change Welcome to React Native! to Hakuna Matata(or what ever text you please) and save file. Now go back to Emulator and click on menu -> Reload. Give yourself a cookie🍪, you made your first changes to your app. But that’s not that intimidating, is it? let’s go deep and start implementing our Main Screen.
UI Kit
The Power of React Native or React as a whole lies in Code reusability, you can simply install and import any npm package and use it. That’s exactly what we are going to do now, A UI Kit have components that let us build Elegant UIs without build everything from scratch. For this Bootcamp we’ll be using React Native Elements. This UI Kit has All the components we need So let’s install it,
to install react-native-elements you must first install and link the peer dependency of react-native-vector-icons. run the following commands to install react-native-elements.
npm i react-native-vector-icons --save && react-native link react-native-vector-iconsnpm i react-native-elements --save
Main Screen

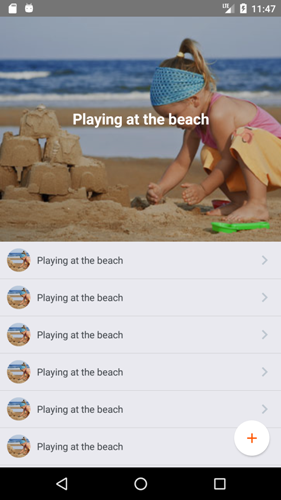
If you look at the above screenshot you’ll see that our main screen contains a Image with Text, a list and a floating button. let’s split it into react-native-elements components and start implementing our Main Screen. If you go to the Documentation of React Native Elements you’ll see that our Main Screen consists of a Tile Component, a List Component and a Icon Button Component. Let’s import the required Components and add them to our Main Screen UI.
import { Icon, ListItem, Tile } from 'react-native-elements';
These are the three Components we need to get started with our Main Screen. In the render method remove the default text and add a Title with a bunch of ListItems.
  render() {
    return (
      <View style={styles.container}>
        <Tile
          imageSrc={{uri: 'http://d33y93cfm0wb4z.cloudfront.net/Ella/client_content/banana_boat/beach_games.jpg'}}
          title="Playing at the beach"
          featured
        />
        <ListItem
          roundAvatar
          avatar={{uri: 'http://d33y93cfm0wb4z.cloudfront.net/Ella/client_content/banana_boat/beach_games.jpg'}}
          title="Playing at the beach"
        />
        <ListItem
          roundAvatar
          avatar={{uri: 'http://d33y93cfm0wb4z.cloudfront.net/Ella/client_content/banana_boat/beach_games.jpg'}}
          title="Playing at the beach"
        />
        <ListItem
          roundAvatar
          avatar={{uri: 'http://d33y93cfm0wb4z.cloudfront.net/Ella/client_content/banana_boat/beach_games.jpg'}}
          title="Playing at the beach"
        />
      </View>
    );
  }
If You reload it now, you see that all the list items look congested at the center. let’s change this, at the bottom of the file there’s a constant defined as style change it as follows
const styles = StyleSheet.create({
  container: {
    flex: 1,
  },
});
now you’ll see that all the components nicely fit the screen and looks almost like our screen shot. the only missing piece is the floating button at the bottom right of the screen let’s add it.
refactor our main view to contain a ScrollView and another View for the Button. ScrollView unlike View make the contents of the View scrollable. ScrollView is part of react-native so you’d import ScrollView as follows
import {
  StyleSheet,
  View,
  ScrollView,
} from 'react-native';
  <View style={styles.container}>
      <ScrollView>
      {
      Previous Title and ListItem Components
      }
      </ScrollView>
    <View style={styles.float}>
      <Icon raised name='add' color='#f50' />
    </View>
  </View>
If you look at the View after the ScrollView it has a style prop set float object of styles, but it doesn’t exist so let’s add float object to styles
const styles = StyleSheet.create({
  container: {
    flex: 1,
  },
  float: {
    position: 'absolute',
    bottom: 10,
    right: 10,
  },
});
Reload the emulator(menu->reload) and you’ll see that our Screen looks exactly like the screen shot. but wait we are manually adding all the ListItems to the Render method, we would want to get the data from somewhere and show it as a list. For now let’s create some dummy data, and later on we’ll swap this dummy data with data from our server. Define a constant dummy_data at the bottom of the file as so,
  const dummy_data = [
  {
    title : "Playing at the beach",
    image : "http://d33y93cfm0wb4z.cloudfront.net/Ella/client_content/banana_boat/beach_games.jpg",
    location : {
      lat : 17.686816,
      lon : 83.218482
    }
  },
  {
    title : "With Tiger at Zoo",
    image : "http://images.hikeezee.com/destinations/indira-gandhi-zoological-park-3059/Indira-Gandhi-National-Park-%2811%29_original_watermark.jpg",
    location : {
      lat : 17.7679,
      lon : 83.3454
    }
  },
  {
    title : "Movie with Friends",
    image : "https://zombiesruineverything.files.wordpress.com/2014/03/winter11111.jpg",
    location : {
      lat : 17.686816,
      lon : 83.218482
    }
  },
  {
    title : "Cricket with Friends",
    image : "http://cdn.c.photoshelter.com/img-get2/I00005RrP4xMOzFc/fit=1000x750/himalayan-gully-cricket-MG-5195.jpg",
    location : {
      lat : 17.686816,
      lon : 83.218482
    }
  },{
    title : "Playing at the beach",
    image : "http://d33y93cfm0wb4z.cloudfront.net/Ella/client_content/banana_boat/beach_games.jpg",
    location : {
      lat : 17.686816,
      lon : 83.218482
    }
  },
  {
    title : "With Tiger at Zoo",
    image : "http://images.hikeezee.com/destinations/indira-gandhi-zoological-park-3059/Indira-Gandhi-National-Park-%2811%29_original_watermark.jpg",
    location : {
      lat : 17.7679,
      lon : 83.3454
    }
  }];
Now Let’s map this dummy_data object array to ListItems, create a method renderListItems with two arguments moment_obj,index
renderListItems(moment_obj,index) {
  return (
    <ListItem
      roundAvatar
      avatar={{ uri: moment_obj.image}}
      key={index}
      title={moment_obj.title}
    />
  );
}
Now you can swap all the contents of ScrollView with the dummy data using map function and our renderListItems method.
      <ScrollView>
      { dummy_data.map(this.renderListItems) }
        </ScrollView>

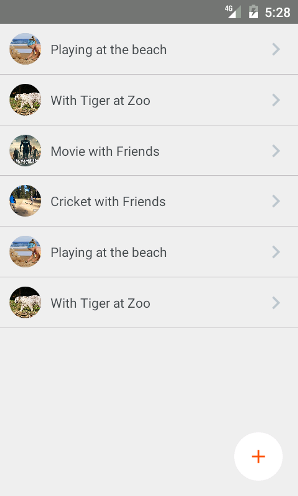
If everything went well your app should look like this, But wait in our first screen shot there was a Tile Component at the top, right? let’s refactor our renderListItems method to return the same.
what we are gonna do is return a Tile Component if the index of the object is 0(zero) and return a ListItem Component otherwise. So our renderListItems should look like
renderListItems(moment_obj,index) {
  if(index == 0)
	  return (
	    <Tile
	      imageSrc={{ uri: moment_obj.image}}
	      title={moment_obj.title}
	      featured
	      key={index}
	    />
	  );
  else
	  return (
	    <ListItem
	      roundAvatar
	      avatar={{ uri: moment_obj.image}}
	      key={index}
	      title={moment_obj.title}
	    />
	  );
}
Now it looks exactly like our first screen shot, add few more objects to your dummy_data array and then go on and reload the app you’ll see that you can scroll down to see the remaining listitems.
Congratulations, with This you have successfully implemented our Main Screen with the dummy data.
Moving on to Part III…